
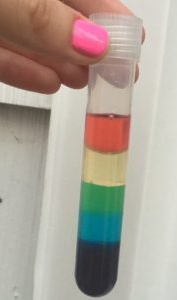
 One of our most popular STEM Night activities was “Rainbow in a Tube” where families learned about the properties of density while carefully adding liquids to test tubes. By pouring in each liquid, they created a beautifully layered rainbow with distinct lines separating each layer of liquid without the liquids mixing.
The supplies for this activity are common items that you might already have at home:
- Honey (about $3-5 per pint and cheaper at warehouse stores) – if buying honey for this activity, we recommend getting a bottle with a pointed nozzle for easier use.
- Blue dishwashing liquid (~$4 per 56 fl oz bottle)
- Rubbing alcohol (~$3 per 32 fl oz bottle)
- Olive oil (~$9 per 1.5 liter) – the oil you use needs to be yellow, which is why we recommend olive oil or corn oil. Soybean oil and other light colored oils are difficult to see.
- Water (free)
- Red, green, and purple food coloring (if you’re using a box of 4 dye colors, you can mix the red and blue to create the purple)
- Cheap plastic test tubes (preferably with a cover which are available on Amazon and science supply stores for ~$0.12 each, but only come in large quantities) or a small jar, which might be easier to find and provides a more striking effect, but requires significantly more supplies.
- Optional: Cheap plastic pipettes (are also available on Amazon and science supply stores) and lets kids feel like scientists in a lab
This activity is really easy to do. Try it out in your kitchen and let your kids do it themselves!
- Dye the alcohol red with the food coloring.
- Dye the water green with the food coloring.
- Dye the honey purple with the food coloring.
- Purple: Pour a layer of purple-dyed honey into the bottom of the jar. It might be difficult to use a pipette or pour it so squeezing some in from a pointed nozzle bottle will be easier.
- Blue: Pour or pipette a layer of blue dishwashing liquid on top of the purple layer.
- Green: Pour or pipette a layer of green-dyed water on top of the blue layer.
- Yellow: Pour or pipette a layer of oil on top of the green layer.
- Red: Pour or pipette a layer of red-dyed rubbing alcohol on top of the yellow layer. (Sorry, there’s no orange.)
When adding layers to the rainbow, it’s important to approximate the appropriate amount. Make sure there is enough room for each layer. If you’re using pipettes, you should use a different one for each liquid to avoid color contamination.
As you add layers to the rainbow, discuss how they’re forming and remaining separated. It’s all about density! The layers don’t mix, as they are in order from the densest (purple honey) to the least dense (red rubbing alcohol). If you don’t shake or stir the rainbow, the colors will stay separated. Have fun!
