
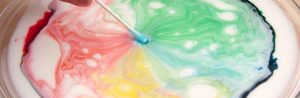
 One of our most popular STEM Night activities was “Tie Dye Milk” where families learned about and played with surface tension to make a cool mix of colors.
The supplies for this activity are common items that you might already have at home:
- Whole milk (only use whole milk, you need the fat to make the experiment work)
- Food coloring (gel or liquid dye)
- Dish soap
- Plates (use deep plates with edges, you don’t want the milk to spill out of the plate)
- Cotton swabs
This experiment is really easy to do. Try it out in your kitchen and let your kids do it themselves!
- Pour (preferably room temperature) milk into the plate until it is filled halfway
- Put several drops of food coloring into the middle of the plate
- Cover one end of a cotton swab with dish soap
- Place the soapy end of the cotton swab into the milk
- Watch the reaction
When you first drop the food coloring on to the milk, the food coloring sits on top. The food coloring is less dense than the milk so it doesn’t sink.
When you put the soapy cotton swab into the milk, the food coloring moves towards the edge of the plate. What causes this reaction? The soap reduces the milk’s surface tension by dissolving the fat molecules in the milk. As this reaction spreads out the food coloring follows along to create cool patterns.
The more colors you use, the more striking the effects will be. If you have a 4-pack of red, yellow, green, and blue, use all of them. The effect will stop when the soap and milk have finished mixing. You can keep it going by adding more dish soap. Try it out a few times, just make sure your kids don’t drink the milk afterward no matter how pretty it looks!
